

Although routers and repeaters are not strictly necessary for a Meshtastic network to function, adding dedicated routers to your mesh can dramatically expand the geographic coverage of the network. As mentioned in my previous post, my current objective is to provide basic coverage to the majority of Greene County. Green county is one of the largest counties in Tennessee with a total area of 624 square miles.
In order to accomplish this goal, the placement of routers at geographically strategic point is a must. Although the range of the meshtastic routers is vast (10-15 miles), line of sight is a requirement. This is a problem considering the multiple ridgelines and hills in this county. Since I do not yet have access to any of the sites on the mountains, I have had to plan on finding high points across the county to build the backbone of the mesh.
As of February 2024, I have been able to acquire permissions for 12 sites. Most nodes are able to make connections with at least 2 other routers which provides redundancy in the mesh.
Choosing a site
As mentioned earlier, line of sight is a requirement for the backbone routers in a mesh network. This ensures that the primary mesh has the most range possible in order for long-haul hops on the network to reach their destination. Also, redundant connections ensure that if a single router fails even though local coverage on the router will be lost the mesh remains intact.
Google Earth has been my go-to planning tool for finding router site candidates. Start with a known node location or a node that is already established. High points and peaks, even just a few hundred feet above the base terrain will dramatically help expand the reach of your router. Turn on 3d viewing and zoom in as close as possible to that point. Lower the tilt down as far as possible to the horizon and use this to find features that can be candidates for new router locations.
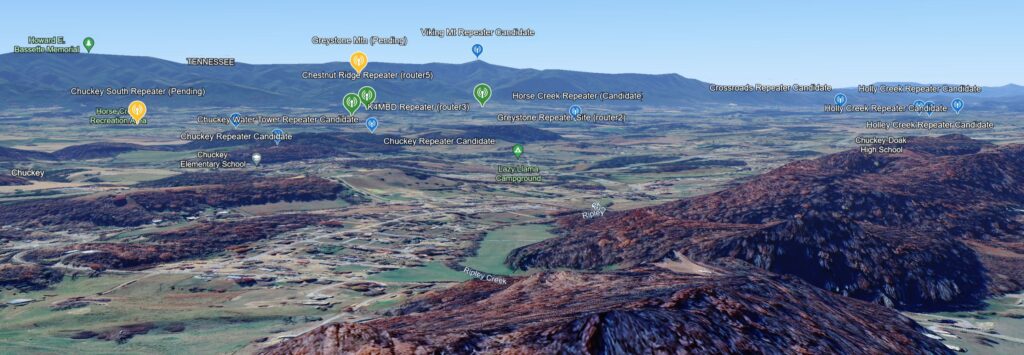
Always try to find the highest point in the local area. Peaks that are above the altitude of the router location will block the signal.
Try to find as many router candidates as possible. This increases the odds of finding a location that you will be able to obtain permssion for. I have found that friends, coworkers, and relatives often have someone in their network that will know about a potential site. Try to go these routes first. Cold contact with someone is less likely to yield a productive conversation. If you do need to make contact with a land owner without a lead, I have found a website that will tell you the current owner.
https://tnmap.tn.gov/assessment/
Other states have similar websites, but this one is my go-to for Tennessee.
Once you have found candidate locations and obtained permission, it is time to start prioritizing. Always begin with locations that can connect with established nodes. This allows you to monitor the routers signal strength and battery state over time. Start with sites that are as far away from each other as possible but still able to get a decent signal. This allows you to cover a large geographic area. Don’t worry about local coverage just yet (unless it is essential for your needs), additional nodes can always be added later.
When you are at the point where local coverage for a particular area is needed, use the same tools for finding router sites. I use google earth to place markers for particular addresses or locations. Look for candidate sites that are able to visually see both the node and at least one other router. Redundancy is not a much of a priority for these routers.
Be aware that although line-of site is great for long-distance connections, it is possible to connect to routers from shorter distances even with obstructions. Testing, and trial and error are the best ways to check for connectivity in these circumstances. Try to get a signal strength of at least -130db to account for varying conditions such as rain or foilage. The traceroute tool is also helpful to ensure that communication is possible between nodes and the rest of the mesh.
A Word of Warning!
Please be aware that meshtastic nodes can interfere with existing repeater and radio systems (government, commercial, and amateur.)
If you are installing near (<500′) a site with existing antennas or towers please check with the existing site owners first to ensure there is no interference. If your radio is causing a problem it will be found.
Please be a good ambassador of this project to others in the radio community.
Also, always obtain permission before installing a radio on private and public property. As tempting as it may be, rogue installations are illegal and are detrimental to the public image of Meshtastic.
Building your routers
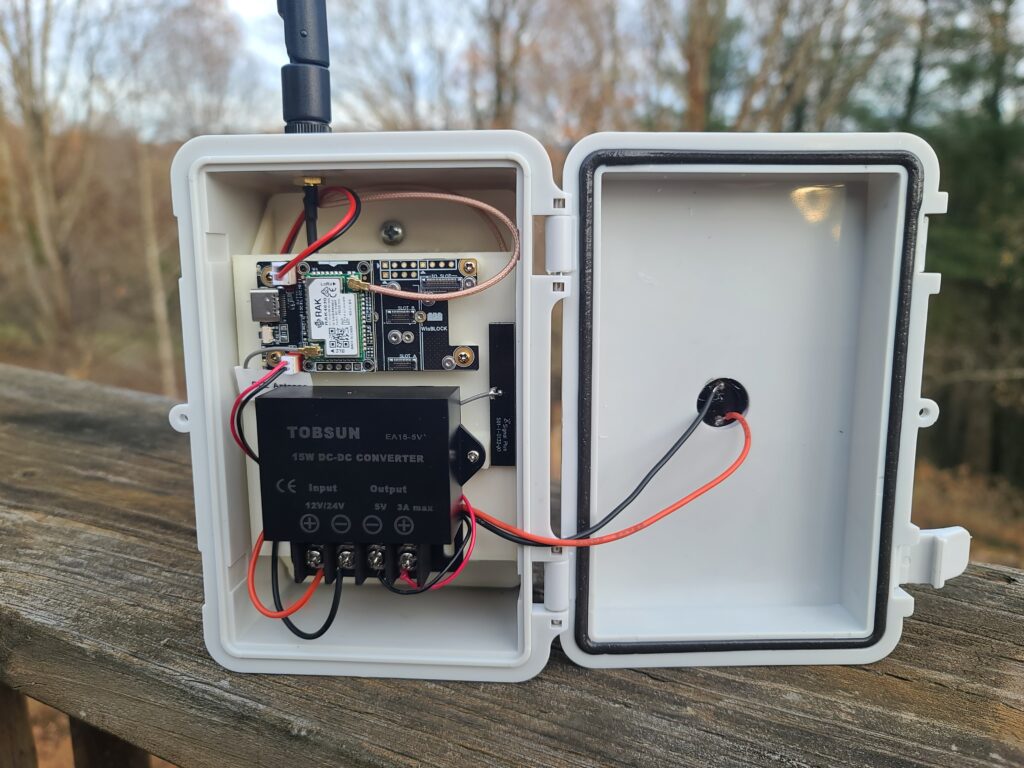
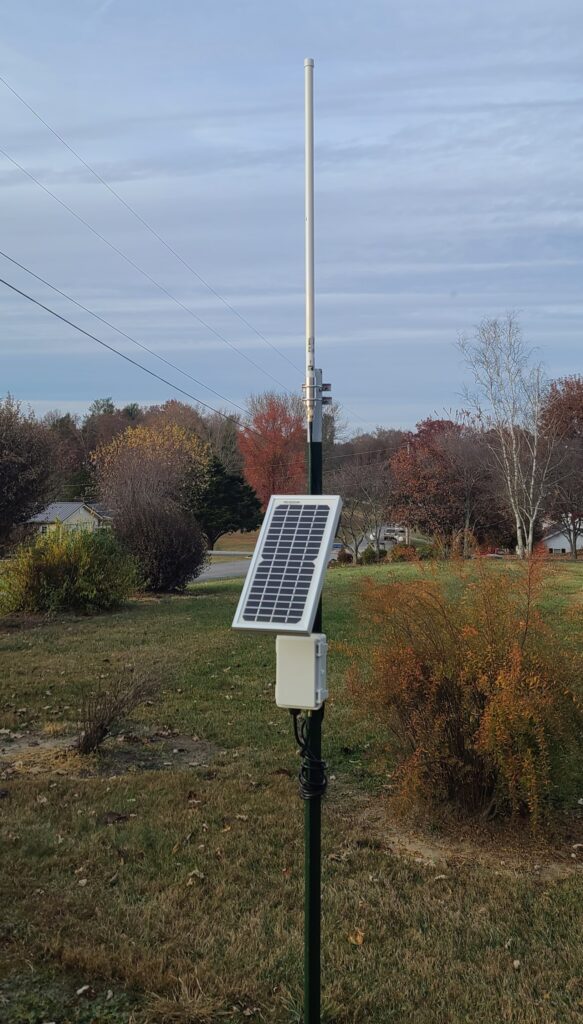
The defacto hardware as of February 2024 for routers and repeaters is the Rak Wireless Wisblock Meshtastic Starter Kit. This uses the RAK4631 radio core and is by far the best choice for a solar powered repeater. The RAK4631 uses an order of magnitude less power that the ESP32 lora modules and has built-in solar charging and battery monitoring.
I have settled on two designs for my routers. One uses an exteral solar panel and is for highly critical areas and areas that do not have direct sunlight. The other uses an integrated solar panel and is best for local routers or areas that have a unobstructed view of the southern sky from east to west.
I have choosen a PVC waterproof enclosure for my standard build. This enclosure is just large enough for the radio, battery, and a voltage converter. The voltage converter is necessary for most solar panels because the built-in solar charging circuit for the RAK module can only handle 5.5V. RAK does sell a Green Energy Module but I have found these buck converters on Amazon for less cost and they seem a little more durable.
One benefit to using an oversized solar panel is that even without direct sunlight, solar cells will produce some voltage. Usually this is more than enough to charge the 18650 cells over time. However, in order to protect the module during peak sunlight, a buck converter is necessary to drop the voltage to 5 volts.
Below is the BOM that I have used for my last several builds. I have had these nodes operational for almost half a year with no issues.
The battery pack and solar panel are extremely oversized for this build. Even without any solar I have had routers last well over a month on the 12000mAh battery packs that I built. I feel that in the event that a solar panel fails this gives you enough time to keep the unit operational until the router is able to be serviced.
Solar Router Build:
| Description | Price Total | Qty | Price each | Parts Required | Price Per Repeater |
| Rack Wisblock | 34.97 | 1 | 34.97 | 1 | 34.97 |
| Battery Cable | 9.97 | 5 | 1.99 | 1 | 1.99 |
| Solar Cable | 9.97 | 5 | 1.99 | 1 | 1.99 |
| Internal Antenna Cable | 7.49 | 5 | 1.498 | 1 | 1.498 |
| 12/24V to 5V converter | 13.99 | 2 | 6.995 | 1 | 6.995 |
| OR | |||||
| Rak Green Power Module | 9.9 | 1 | 9.9 | 1 | 9.9 |
| External 5W Solar Panel | 18.9 | 1 | 18.9 | 1 | 18.9 |
| OR | |||||
| Integrated Solar Panel | 15.99 | 5 | 3.19 | 1 | 3.19 |
| T Post | 8.99 | 1 | 8.99 | 1 | 8.79 |
| Clamps | 11.98 | 20 | 0.599 | 4 | 2.396 |
| Enclosure | 9.99 | 1 | 9.99 | 1 | 9.99 |
| 9dBi Antenna | 18 | 1 | 18 | 1 | 18 |
| SMA Male to N Male Cable | 10.59 | 1 | 10.59 | 1 | 10.59 |
| Optional 5dB Antenna (no cable) | 13.99 | 2 | 6.99 | 1 | 6.99 |
| Enclosure Mounting Screws | 6.08 | 25 | 0.2432 | 4 | 0.9728 |
| Enclosure Interior Screws | 2.48 | 12 | 0.2066666667 | 2 | 0.4133333333 |
| Battery Pack* | 29.99 | 1 | 29.99 | 1 | 29.99 |
| Small Screws | 8.39 | – | 8.39 | – | 8.39 |
NOTES FOR THIS BUILD:
There are several types of solar panels available that will work with this system. I would recommend a traditional aluminum frame with glass panel type panel as this will last far longer that the cheaper plastic modules.
If using the Integrated Solar Panel you will need to drill a 3/4 hole in the front of the enclosure. Use a high quality silicon sealant to keep water from entering the enclosure and put a bead of sealant around the edge of the cell to keep water from getting behind it. You will need to solder wire to the cell and pass them through the hole to connect to the voltage converter.
The antenna is one of the most critical aspects of the router build. Again there are several types that will work but I would recommend getting one with around 8-9 dBi Gain. This will keep the signal from being too directional and will give the most well rounded coverage. Ensure that the antenna cable is the correct gender and type. SMA and RP-SMA are NOT compatible without an adapter.
*Batteries – You will need to replace the connector on this battery pack. This will require splicing or opening the plastic case and soldering on the new connector. I have effectively built my own battery packs using reclaimed or new 18650 cells. I use 4 – 3000 mAh 3.7V Li-ion batteries taped together and connected in parallel. Ideally you should spot weld these but it is possible to solder them with patience. Use fine sandpaper to roughen the connection points and use a high power soldering gun to apply heat quickly with flux and solder. BE CAREFULL! These cells can produce very high currents when shorted so do this outside and make sure that you cover the other side of the batteries when working.
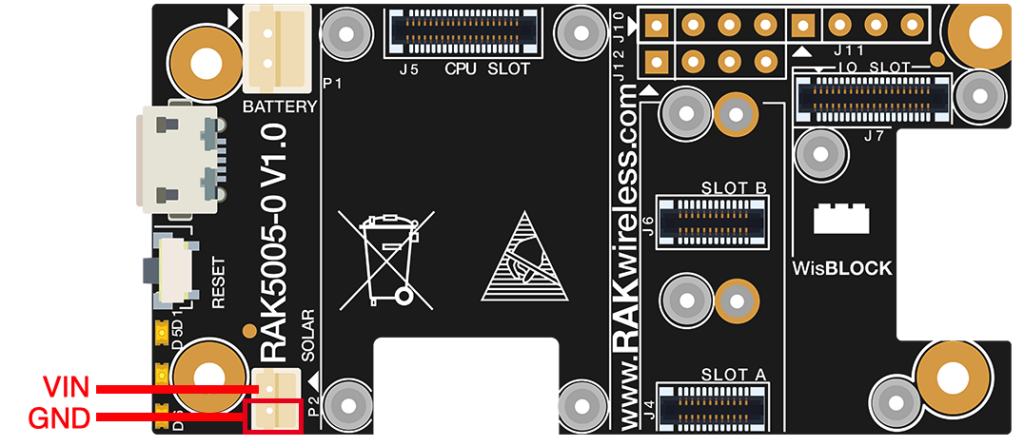
WARNING!!!
Be absolutely sure that the polarity on the battery connector is correct. YOU WILL INSTANTLY DESTROY THE MODULE IF THIS IS WRONG! Ask me how I know…. Below is the pinout for the Rak Wisblock baseboard. Confirm the voltage polarity with a voltmeter before connecting.
ANOTHER WARNING!!!
DO NOT SUPPLY POWER TO THE MODULE UNLESS AN ANTENNA IS INSTALLED! This will also destroy the radio.
Battery Connection:
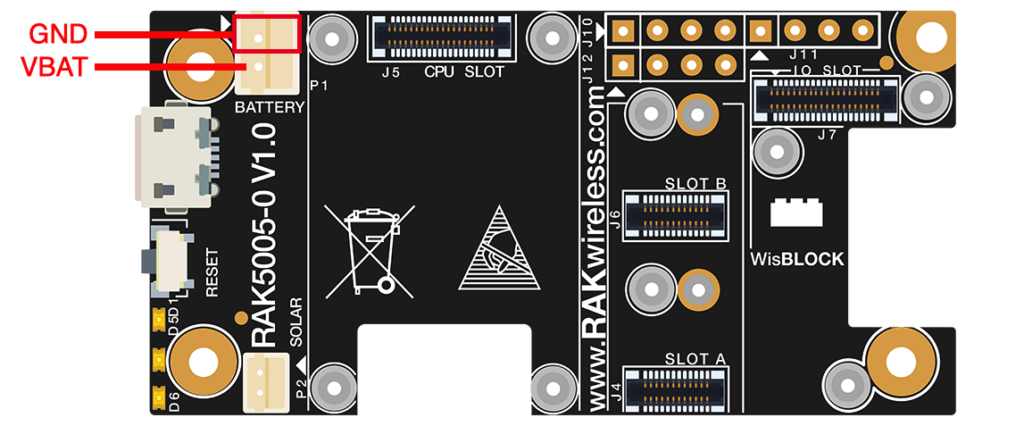
Solar Connection:
Here is the Link to the Rak Wisblock Baseboard Datasheet:
https://docs.rakwireless.com/Product-Categories/WisBlock/RAK5005-O/Datasheet/#hardware
Here is a link to the 3d printed parts I designed for this build:
https://www.thingiverse.com/thing:6483529
If you need the 3d parts produced or would like me to assemble the entire router for you please contact me for details at K4MBD.ham@gmail.com
Deploying Routers
If you are interested in building a router, hop on the Greene County Discord server and discuss your plans. Coordinating coverage helps the network grow and reduces unnecessary traffic.
Greene County Meshtastic Discord Link: https://discord.com/invite/KAC8jDZhRf
East Tennessee Meshtastic Router Map: https://canvis.app/CdPWf5
Leave a Reply